I put this fresh milled flour sourdough 101 together to hopefully help simplify sourdough for you! In this you’ll find definitions to common words used in the sourdough world, learn about hydration and feeding ratios, under/over proofing, making your very own fresh milled flour sourdough starter, and more!

Fresh Milled Flour Sourdough 101 Table of Contents
- Common Sourdough Definitions
- What Are Feeding Ratios?
- What Is Hydration % And How To Calculate It?
- Can I Make My Own Fresh Milled Flour Sourdough Starter?
- How Should I Store My Starter?
- What Is This Gray Layer On My Starter?
- Should I Cover My Sourdough Starter?
- Timeline Examples
- Common Sourdough Questions
- Signs of Underproofing
- Signs of Overproofing
- Shop This Post
- Sourdough Recipes
Common Sourdough Definitions
Autolyse– pronounced “aw-toe-lease” refers to the process of mixing only flour and water together and letting it rest for a period of time before adding the sourdough starter and salt.
Banneton– A proofing basket that is used to shape and support the dough while it rises.
Boule– A round loaf of bread.
Batard– An oblong, oval shaped loaf of bread.
Bulk Fermentation– The first stage of dough fermentation, also known as the first rise.
Cold Proof/Retard– When you place your dough in the refrigerator for an extended period to slow down the fermentation process. It Improves flavor complexity, creates a better crust, makes the dough easier to handle, and allows for flexible baking schedules.
Discard– The portion of the starter that is removed and discarded before feeding the remaining starter during regular maintenance. You can use in discard recipes.
Feeding– Adding fresh water and flour to a starter so the wild yeast and bacteria within the starter with “food” to continue fermenting and stay active.
Hydration– Refers to the total amount of water in the dough.
Lame– A tool used to score sourdough.
Levain– Active sourdough starter that will be used to make sourdough bread.
Shaping– Is done after the bulk fermentation by tucking and folding to shape into a desired form while creating surface tension so it holds it’s shape while baking.
Starter– A live, fermented culture of flour and water used to leaven bread.
Stretch & Folds– A technique where you gently pull the edges of the dough outward, then fold them back over themselves, essentially stretching and manipulating the gluten network within the dough to strengthen it and improve its texture, typically done during the bulk fermentation stage.
Coil Folds– Another method of strengthening and developing gluten in the dough. It is a more gentle alternative to the more popular stretch and fold method.
Sourdough– Bread made from flour, water, and salt that is leavened with a fermented starter.
Baker’s Percentages– A method of expressing a bread recipe where the weight of the flour is always considered 100%, and every other ingredient is calculated as a percentage of that flour weight, allowing for easy scaling of recipes up or down based on the flour quantity.
Crumb– The texture of the inside of the loaf. Also, an indicator of how well the dough fermented.
What Are Feeding Ratios?
A sourdough feeding ratio refers to the proportion of starter, flour, and water. You can keep your feeding at a 1:1:1 ratio for the fastest peak or increase the ratio for it to take longer to reach peak.
Starter: Flour: Water
The 1:1:1 feeding ratio will become active at the fastest rate of about 4-6 hours. This will also require more frequent feedings. This will also vary with the temperature in your home.
ex. 50g starter: 50g flour: 50 grams water
The 1:5:5 feeding ratio (I prefer this ratio if I’m feeding my starter the night before for a recipe because my house is fairly warm, especially during the winter):
ex. 20 grams starter: 100 grams flour : 100 grams water
The 1:10:10 ratio will take longer to peak and is great if you are looking to feed your starter less often.:
ex. 10 grams starter: 100 grams flour: 100 grams water
You do not have to use these exact amounts. They are just a helpful example. I do different amounts all of the time depending on how much I need for a recipe or if I am doubling or tripling the recipe. Feel free to change it up based on what works for you.
What Is Hydration % And How To Calculate It?
Hydration refers to the ratio of water to flour in a sourdough recipe. This INCLUDES the amount of water and flour in your starter. If your starter is 100% hydration, meaning you feed it equal parts of flour and water then the percentage is then calculated by using the following equation:
(Weight of Water / Weight of Flour) x 100
For example: 489g water/651g flour = .75 x 100 = 75%
My sourdough recipe uses 438g water, 600g flour, and 102g starter. Since my starter is considered 100% hydration I divide the 102g/2 and this gives me 51g. The 51g water and 51g flour needs to be added to the original flour and water amounts my recipe calls for to calculate the dough hydration. So my total water = 489g (438g from recipe + 51g from starter) and my total flour = 651g (600g from recipe +51 grams starter).
Can I Make My Own Fresh Milled Flour Sourdough Starter?
Making your own sourdough starter can seem daunting, but it’s actually pretty easy. It just requires flour, water, and patience. You can see my steps I use to make a fresh milled flour sourdough starter from scratch here.
How Should I Store My Starter?
Proper storage of your sourdough starter is key to keeping it healthy and thriving. The ideal spots for a starter are somewhere slightly warm 75°F – 82°F with some airflow, like a kitchen counter away from drafts or heat sources.
Below 70°F, fermentation will slow significantly. If you keep your house cooler than 70°F here are some ideas for keeping your starter in a warmer spot in the house:
- On the top of your refrigerator (The area around the fridge tends to be warmer due to rising heat.)
- In a cupboard near the oven
- A spot above a heating vent
- In the microwave or oven with the light on (This option can be more risky. If you do this put a BIG note over your controls so someone doesn’t turn it on while it’s in there.)
- Feed your starter with warm water (below 120F)
- Use a yogurt maker or instant pot with yogurt setting
- Use a seedling mat
- A warm water bath
Here are a few ways NOT to store your starter:
Near direct heat – Avoid placing your sourdough starter in a spot that gets direct sunlight or near a heat source (like an oven, radiator, or stovetop). Too much heat can kill the natural yeast and bacteria, causing it to stall or die.
In the fridge, if you plan to use it daily – While the fridge is perfect for long-term storage (if you’re not using it frequently), storing it there if you bake often might slow down its activity too much. A cold environment can make it sluggish. If you need to store it in the fridge temporarily, make sure to give it a “refresh” when you pull it out before using it.
In a sealed container with no airflow – If you’re storing it in an airtight container, avoid it unless you’re refrigerating. Your starter needs some airflow to breathe and allow the yeast and bacteria to thrive. Without it, you might risk an overly acidic starter or mold growth. I just set a mason jar lid on top without the band and it works great and isn’t airtight so the starter can still breathe. I’ve used a coffee filter and rubber band before, but noticed it gets a dry top layer and seemed to affect my weight by letting moisture out.
Next to strong-smelling items – Sourdough starters are sensitive to odors. Don’t store it near foods like onions, garlic, or cleaning products as it could absorb those smells.
Near Your Kitchen Sink – Sinks are places where food scraps, soap, and cleaning chemicals tend to collect. If there are any spills, food particles, or strong-smelling items nearby, your starter could absorb some of those smells or even pick up unwanted bacteria or contaminants.
Near Other Ferments – Different ferments (like kombucha, kimchi, or yogurt) contain distinct strains of bacteria and yeast. When stored too close together, there’s a risk of cross-contamination. The microorganisms from one ferment could interfere with or outcompete the cultures in your sourdough starter, affecting its rise, flavor, and overall health. For example, the acidic environment of something like kimchi might cause your starter to become overly sour. Try to keep ferments at least 3-5 feet away from each other.
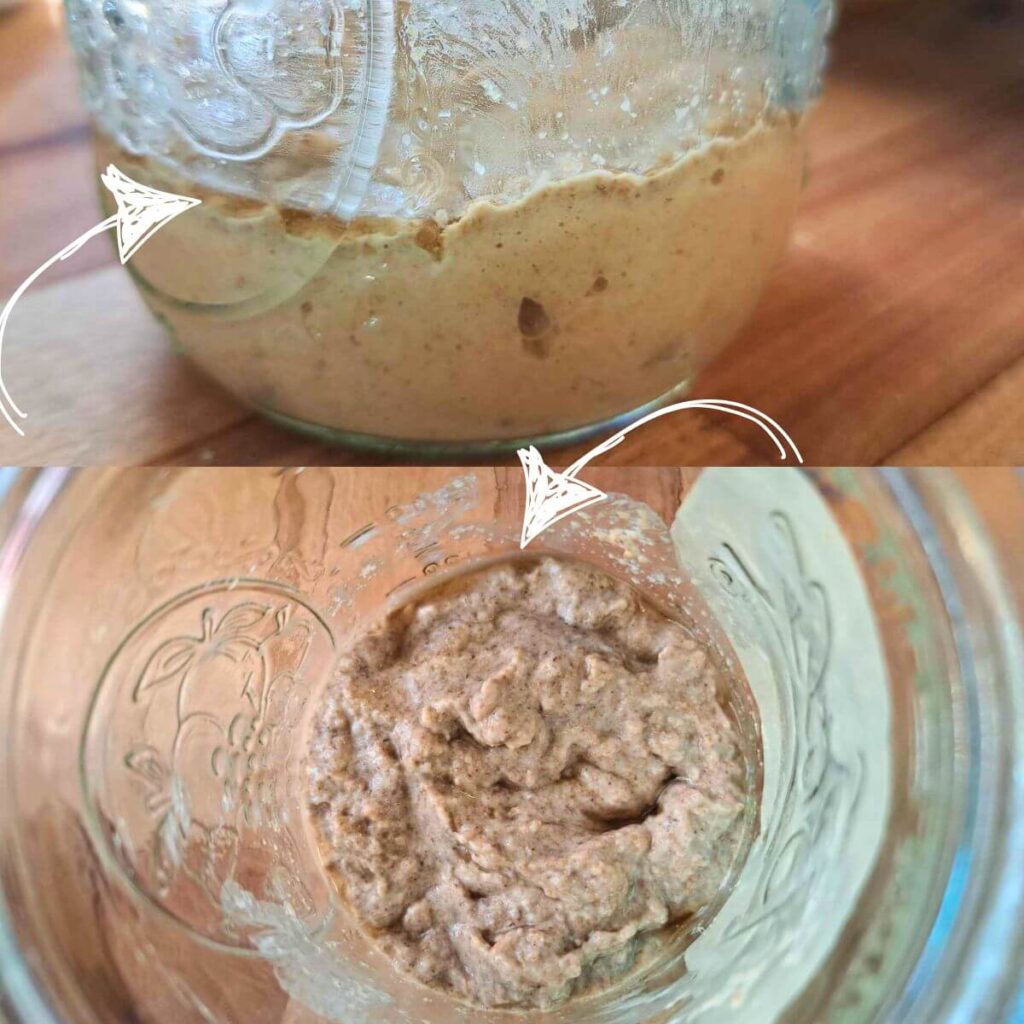
What Is This Gray Layer On My Starter?
This is called “Hooch”. It is completely normal and it just means your sourdough starter is hungry and needs to be fed. Hooch is the by-product or waste of the bacteria and yeast after they’ve digested all the flour in the sourdough starter. You can just stir it in or pour off the hooch and feed your starter and carry on!
Should I Cover My Sourdough Starter?
Yes, you will want to cover your sourdough starter to keep contaminants and fruit flies out. You will want to use a lid that doesn’t fasten tightly and can let the gasses from fermentation out. I personally just use the mason jar lid with the band loosely fastened just enough to not fall off.
Here are a few other methods:
- Coffee filter with the band or a rubber band. (With this method I found that the top of my starter would dry out.)
- Paper Towel with the band or a rubber band.
- Weck Jar (with rubber gasket removed)
- Pickle Pipe For Mason Jar


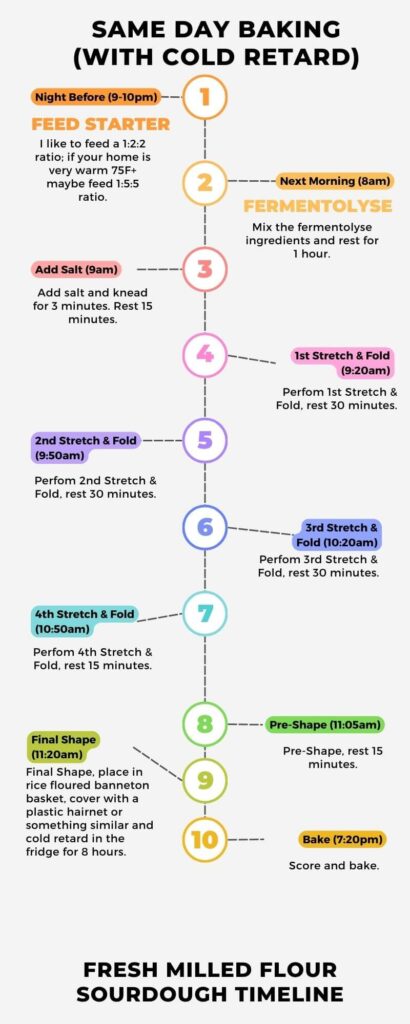
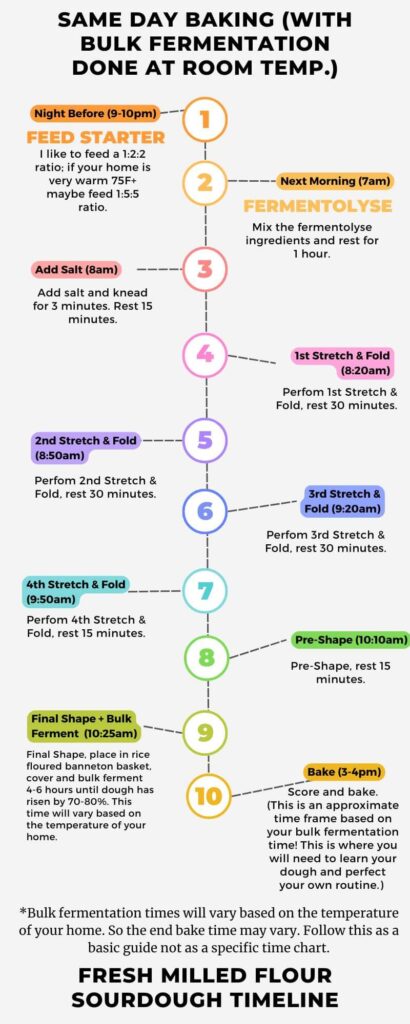
Timeline Examples
These are just outlines to follow. Feel Free to change the times to suit your routine.

Common Sourdough Questions
Boule vs. Batard
A boule is just a term referring to a round loaf and batard is an oblong, oval shaped loaf of bread. I actually prefer baking the sourdough in the batard shape in the cast iron loaf pan that I have linked in the ‘Shop This Post’ section below due to the normal sandwich loaf shape it gives and I think the support from the sides give it a boost in oven spring.
Do I Really Need A Banneton?
Yes and no. It depends on your end goal. Just have edible sourdough bread, no. Achieving beautiful designs and a consistent shape, yes. So, for a while I was just using tea towels to line a pyrex bowl for my sourdough bread. This technically works, but the bannetons make your scoring better in my opinion. When using a banneton it helps your dough keep it’s shape and helps “wick” away just enough moisture to leave a “skin” for easier scoring. All in all I recommend getting a banneton if you’re going to be doing sourdough long-term. If you’re new or just experimenting don’t feel pressured to get one just to try making sourdough.
Do I Have To Have A Dutch Oven?
Technically, no. I have tried open baking and using a dutch oven and I definitely prefer using the dutch oven. The dutch oven traps the moisture and creates steam yielding a softer crust. When open baking you will have to add moisture by spritzing water directly in the oven or adding a pan of boiling water to the rack below your bread. I personally liked the crust better when my bread is baked in a dutch oven. The open baked crust was noticeably harder for me. I really like using the 2-in-1 dutch oven I have linked below in the ‘Shop This Post’ section. I use it upside down since the lid is the perfect shape for turning this dutch oven into a “dome” and you get the added perk of being able to see your loaf bake the rest of the time with the lid off without opening the oven!

What Is A Stretch & Fold?
Stretch and fold is a technique where you gently pull a portion of the dough from the side of a bowl, stretch it out, and then fold it back over itself, repeating this process around the bowl to strengthen the gluten network within the dough, improving its texture and rise during fermentation. Turn the bowl about a quarter turn and complete 4 turns total to complete 1 round of stretch and folds.
What Is A Coil Fold?
A coil fold is a gentle folding technique used during bulk fermentation to develop gluten in the dough by gently lifting and folding the dough over itself, creating a coiling motion, which helps strengthen the gluten network without aggressively stretching it.
Autolyse Vs. Fermentolyse
Autolyse, pronounced “aw-toe-lease” refers to the process of mixing only flour and water together and letting it rest for a period of time before adding the sourdough starter and salt. My recipe uses the fermentolyse method which combines the flour, water, and starter together at the beginning allowing fermentation to start immediately before adding salt giving the bulk fermentation a head start.
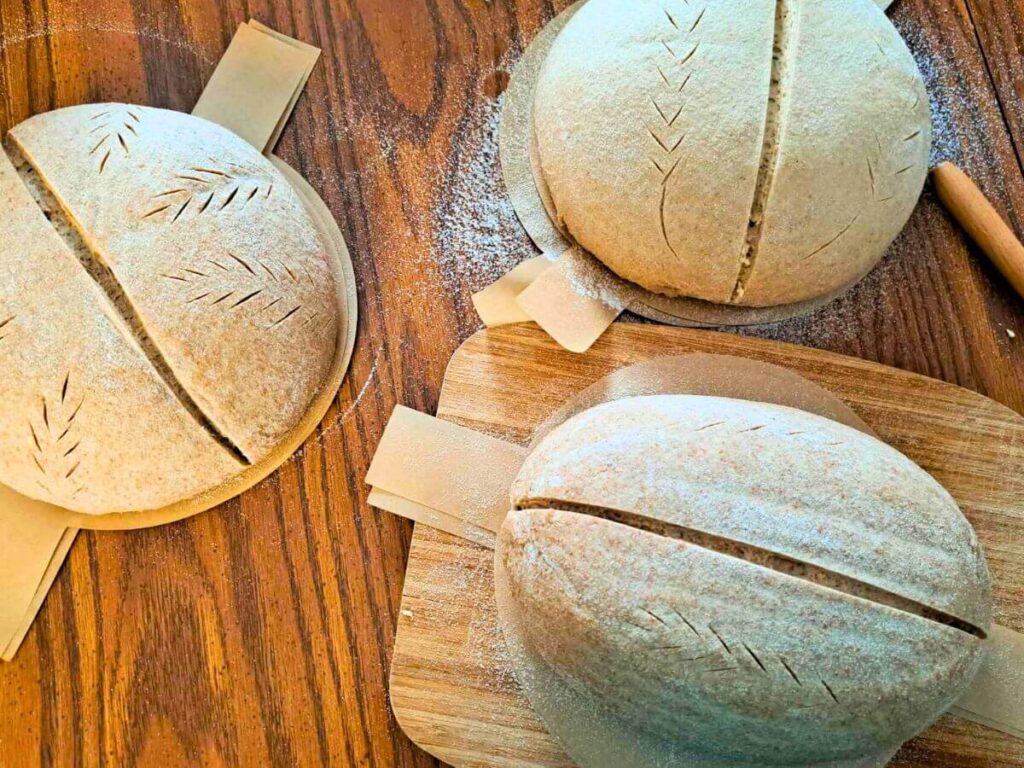
Do I Have To Score My Sourdough Bread?
Yes, you should. Scoring allows the trapped gas to escape in a controlled manner during baking. If you don’t score your bread you will burst open at it’s weakest point causing cracking and uneven expansion. The main score should be between 1/4-1/2″ deep and if you are doing decorative scoring it will be closer to 1/4″. Keep in mind you will get better with practice and it is also easier to score dough that is cold from the refrigerator.
Signs of Underproofing
- Gummy texture inside. (This can also occur if you cut into it before it’s cool.)
- Cracks aside from your scoring. (I included a picture below.)
- Dense Loaf (feels very heavy)
- Tight Crumb (This may be hard to judge since the crumb in fresh milled flour sourdough is tighter than with storebought flour anyways, but once you’ve made a handful of decent loaves you will be able to tell the difference.)

Signs of Overproofing
- Dough seems loose and floppy and won’t hold it’s shape.
- Flat loaf after baking due to the weak gluten structure of the dough.
- May taste more sour or acidic.
- Sticky/tacky dough. It may stick to your lame when trying to score your loaf.
- Scoring spreads way open instead of staying nice and tight.
Don’t fret if you have overproofed your dough! You can easily turn it into a delicious focaccia bread. In a 9×13 pan lined with parchment paper (not required, but I usually get sticking if I don’t use it) drizzle about 1/4 cup of olive oil. Then spread the dough around with your hands to fill the pan. Flip it over and drizzle a little more olive oil. Using oiled fingers poke dimples all over the dough. The dimples fill with olive oil and seasonings to create a delicious, crispy crust. Then bake at 425F for 25-30 minutes until golden brown.
Focaccia recipes are never shy on the olive oil. Whatever topping you choose, mix it first with a generous amount of olive oil, or else things like herbs and garlic will dry out on top not taste as good. This is a fun bread to get creative with or have it simply plain with salt and have as a side for pasta!
Focaccia Flavor Ideas
Cheese & Rosemary – Try adding grated parmesan, mozzarella, or fontina along with fresh rosemary. You could even add some grated lemon zest for an extra pop of flavor.
Pizza Style Add pepperoni, mozzarella, and any other pizza toppings you like and then dip in marinara.
Sundried Tomato & Olives – Mix in chopped sundried tomatoes, kalamata olives, and a bit of garlic for a savory, tangy flavor.
Caramelized Onion & Balsamic – Sweet, caramelized onions paired with a drizzle of balsamic vinegar for a lovely contrast of flavor.
S’mores – A dessert-inspired focaccia with mini marshmallows, chocolate chunks, and a sprinkle of crushed graham crackers on top.
Buffalo Chicken – Add shredded buffalo chicken, blue cheese crumbles, and a little ranch drizzle on top for a spicy, creamy kick.
Margherita – Classic pizza vibes! Top with fresh mozzarella, fresh basil, and a drizzle of olive oil. Maybe finish with a sprinkle of Parmesan and a pinch of sea salt.
Pesto & Sun-dried Tomato – Use pesto as your base sauce, then top with sun-dried tomatoes, fresh mozzarella, and a sprinkle of pine nuts. Perfect for a fresh, herby flavor!
Four Cheese Focaccia – A melty, indulgent option with mozzarella, cheddar, Parmesan, and ricotta. You can even add a few fresh herbs like thyme or basil for extra flavor.
Shop This Post


Where To Buy Grains Online


This post contains affiliate links, which means I make a small commission at no extra cost to you.