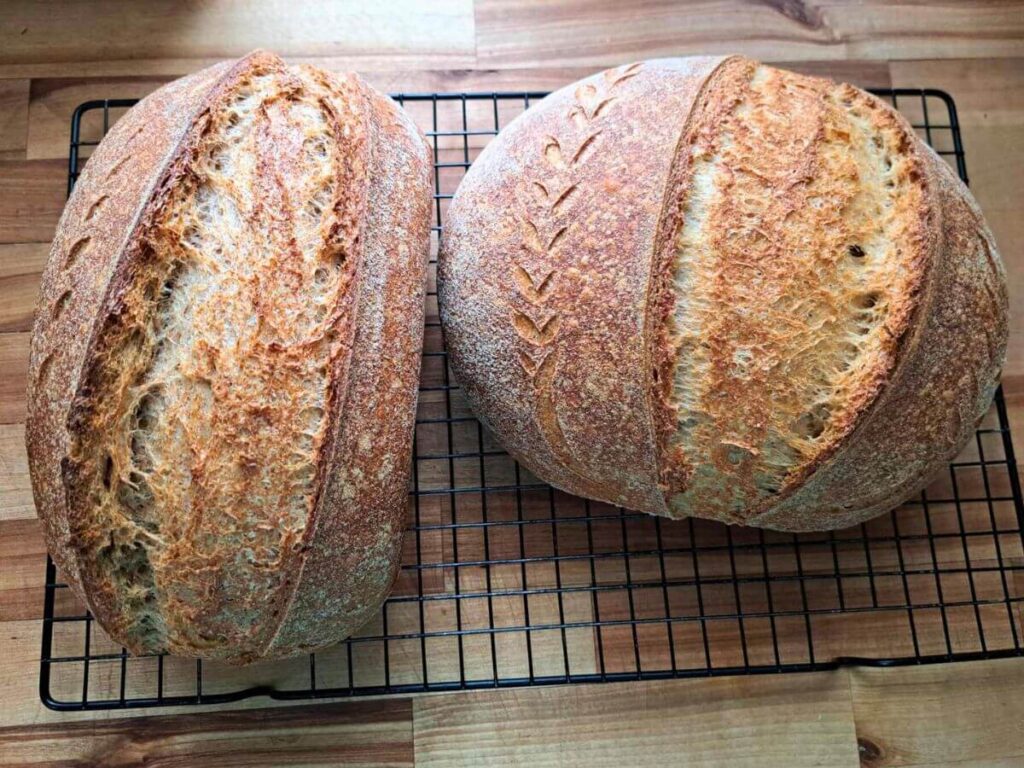
Create a delicious 100% fresh milled flour sourdough boule/batard loaf! This recipe is good for beginners or seasoned sourdough bakers that are having a hard time with fresh milled flour. This yields a nice soft inside with a nice crispy, crackly crust!
Please, please, please take the time to read through this entire post before the recipe, especially if you are new to sourdough. I am not a professional by any means, but the information I’m sharing is what I’ve put together over months of testing fresh milled flour sourdough. I will include multiple “Jump To Recipe” buttons along the way because I know it is a lot, but I promise it is ALL valuable information.
Ok, I have been testing and testing…..and testing sourdough bread with 100% fresh milled flour for months! I have had plenty of failures, but that has led me to understand the sourdough process A LOT more. Even the “failures” for the most part were edible. I would turn loaves that were flat into garlic bread or overproofed loaves into a delicious foccacia bread.
Fresh milled flour sourdough has been a whole different animal to work with. I have made it to this point, but hopefully overtime I can try and perfect it even more. I will update this post as/if I do.
I have tried only using hard white wheat, 50% hard red with 50% hard white wheat, hard white wheat with vital wheat gluten, 85% hydration, 70% hydration, and the list goes on.
So far what has yielded the best results is:
-A 50% hard red and 50% hard white wheat combination. The hard red seems to give it just the little bit of extra strength that the white is lacking.
-A loaf that’s made with 100% hard white wheat with added gluten flour.
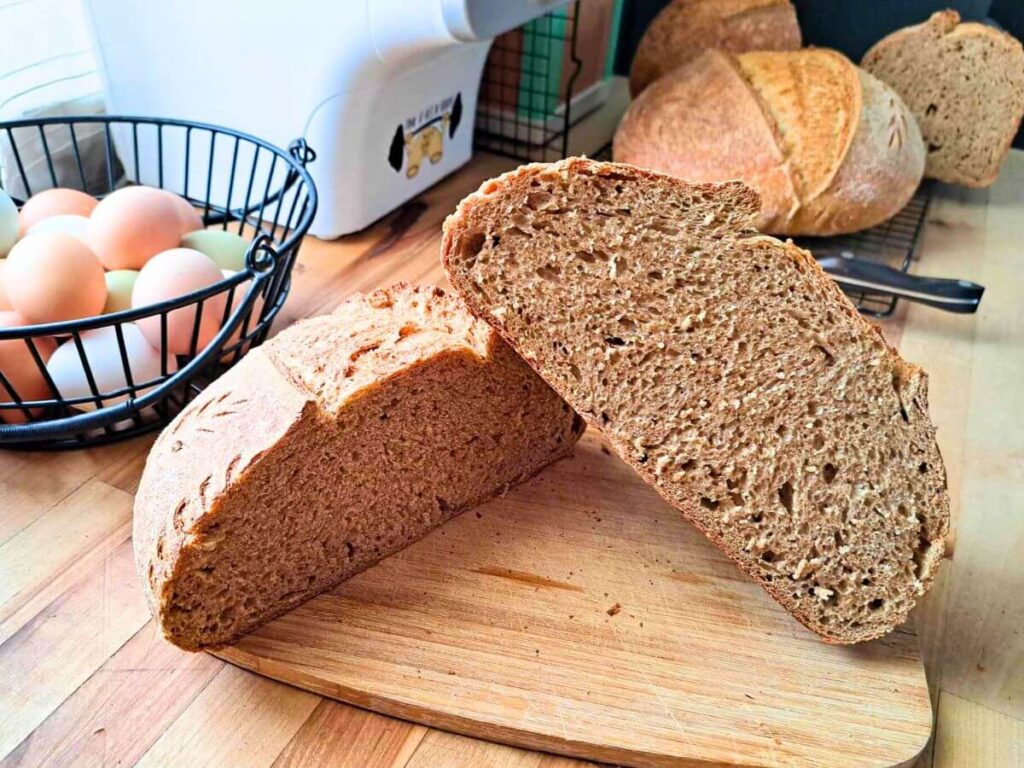
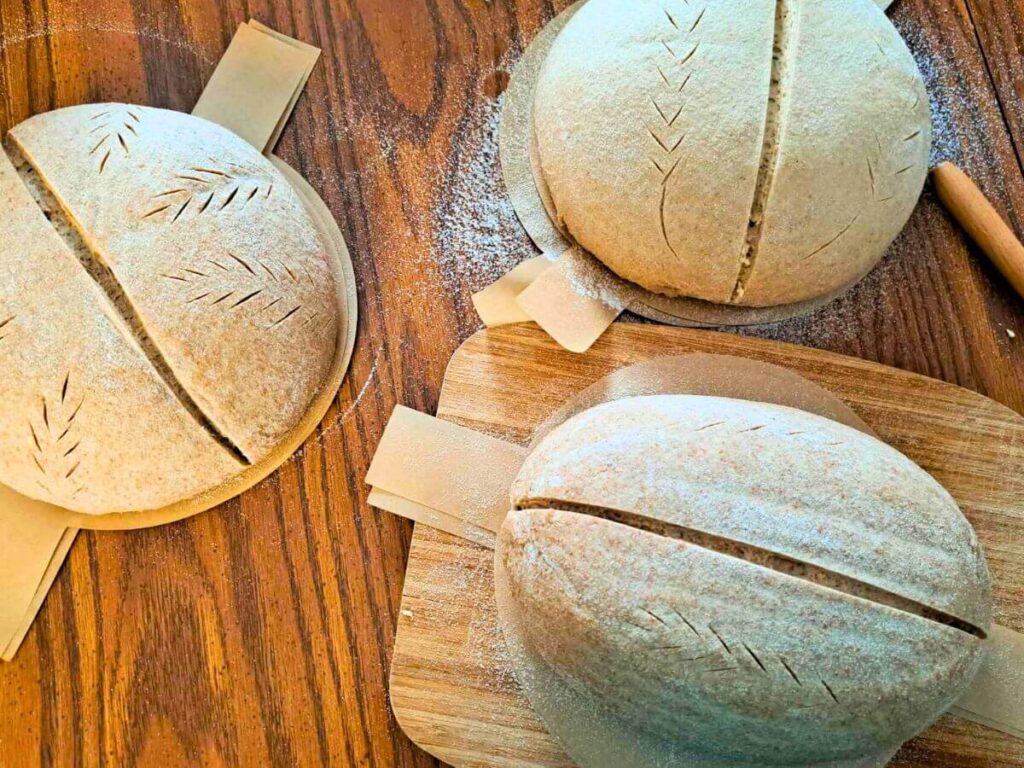
As you can see below the loaf that used the hard white with the gluten flour yielded a better oven spring than the 50% hard red 50% hard white loaf with no gluten flour. *Excuse my hack job cutting on the left lol*
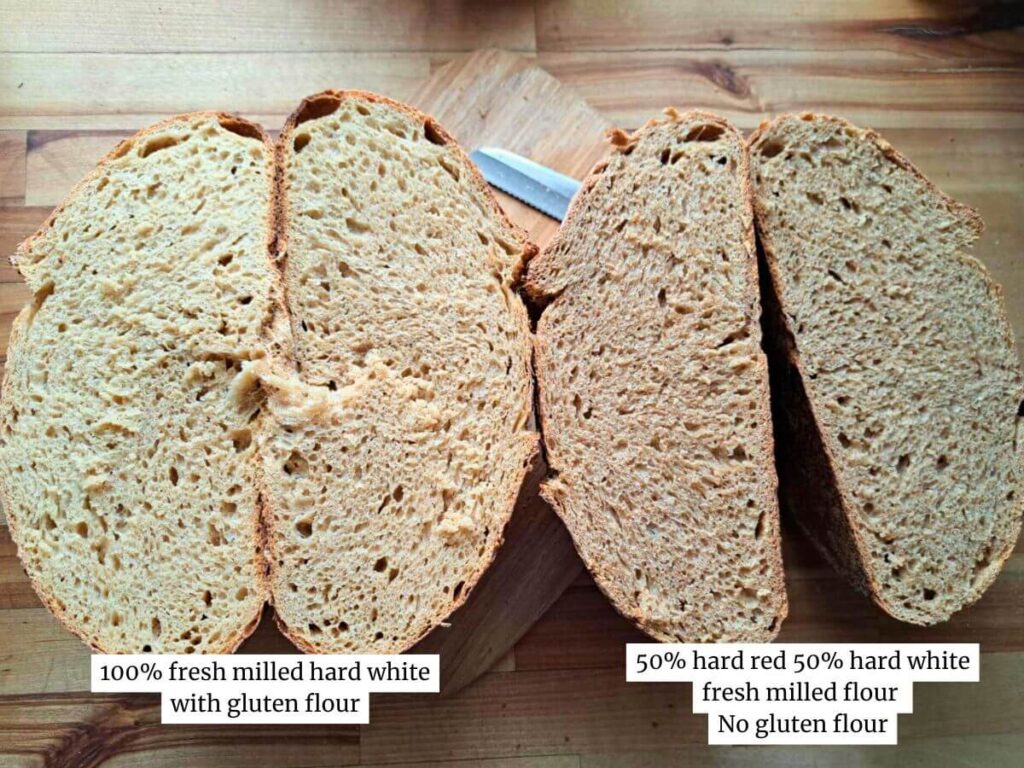
If you want to avoid adding gluten flour, I would direct you to the hard red/hard white combination. You could even try a 100% hard red and I’m sure it would work. If you want to stick with 100% hard white wheat without additives it is possible, you just might not get as much of an oven spring.
The crumb of your sourdough loaves is affected by the hydration of your dough. A higher hydration yields a more open crumb and a lower hydration yields a more tight crumb. You most likely will not get near the same open crumb as with store-bought flour sourdough, but in my own opinion I don’t mind having less big open holes for my butter to drip through.
For this recipe I have settled on a total hydration of 75% for my dough. I may need to perfect my technique because I’m not an expert on this at all, but when I try to go with a higher hydration I end up with way less oven spring and flatter loaves. If I learn how to go with a higher hydration and it has good results I will be sure to share that info, too! Once you’re comfortable with this recipe feel free to play around with hydration levels and make it your own!
What You’ll Need To Make Sourdough Bread Made With 100% Fresh Milled Flour
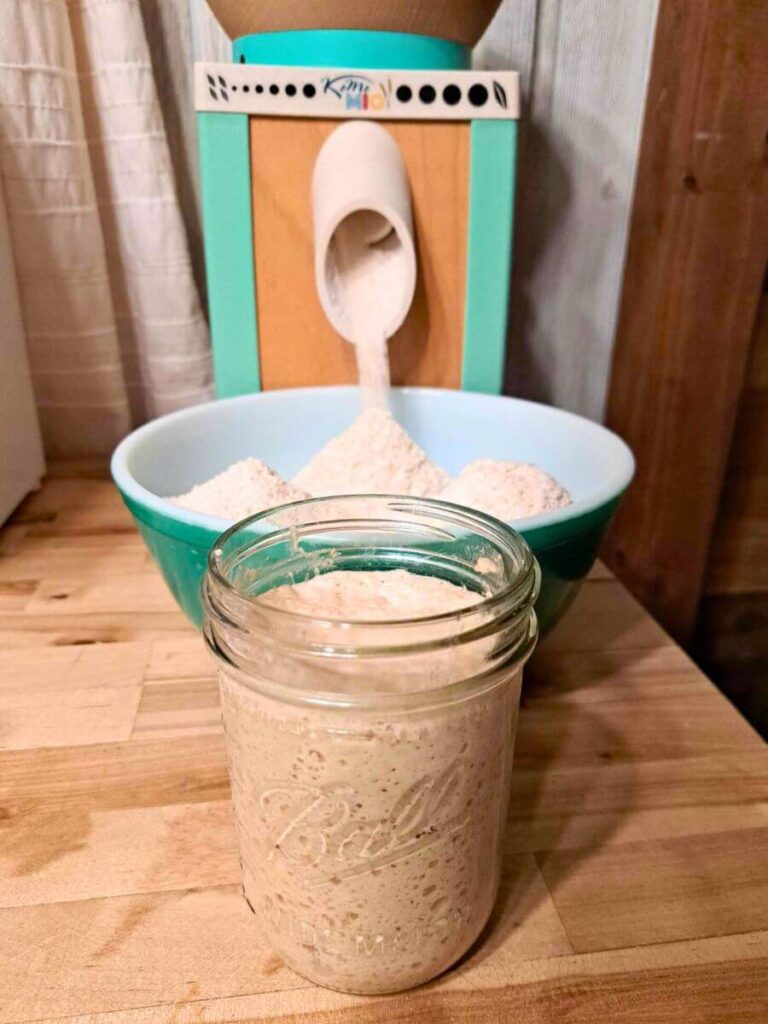
Fresh Milled Hard White and/or Hard Red Flour: I use my flour straight from the mill when it is warm.
Active Sourdough Starter
Water: I use room temperature water. For me this varies between 70-75F.
Salt
Rice Flour: For dusting your loaf and banneton. Rice flour also helps your scoring stand out.
Optional: Gluten Flour: Using this helps boost the oven spring and overall strength of your dough. If you don’t have it or need to avoid it your bread will still turn out. Just note your loaf may be a touch shorter without it.
*Please note that I intentionally use my flour warm from my mill (it’s about 100F) and room temperature water for my process. If your house is significantly cooler this can slow down fermentation. If your home is between 60-65F I’d recommend letting it bulk ferment an extra 30-60 minutes at room temperature before moving it to the fridge. If your bread is bursting in places that you didn’t score this is a sign that your dough was underproofed. This recipe is the process I have laid out that has repeatedly worked for my home’s temperature, but this I definitely recommend keeping notes or a journal while you are learning your dough since this process will vary for everyone due to temperature and humidity. So please keep that in mind.
How This Method Works
Fresh milled flour sourdough ferments quicker than sourdough made with store-bought flour. The method I have laid out uses a fermentolyse instead of an autolyse and this gives the dough a jumpstart on bulk fermentation since bulk fermentation starts when the starter is added to the flour and water.
The entire time that you’re doing your stretch and folds your dough is bulk fermenting. When I first started I was confused and thought it started after my stretch and folds so I was overproofing my dough and ending up with flat bread and/or hockey pucks. So it is bulk fermenting through the stretch and folds, pre-shape, and final shape. Then right after the final shape it goes into the fridge and it will still continue to bulk ferment as it’s cooling down to the fridge temperature. In my fridge that is set to 37F it took 6+ hours for my dough to even reach the low 40’s.
I know this seems to go against the most common sourdough methods, but it has worked repeatedly with consistent results for me. Most of the year our home is between 70-75F so this should work for that temperature range. It will start to vary if you keep your home cooler. If your home is between 60-65F I’d recommend letting it maybe set after your last stretch and fold for an additional hour or so (you’ll have to perfect this timeframe). If you don’t have air conditioning in the summer it will likely ferment more quickly so you might have to only do 3 stretch and folds and then pre-shape, shape, and refrigerate. This will be something that will vary in different climates and is a good reason to keep notes when baking, taking notes of the temperature of the dough, temperature of your home, outside temperature/humidity, and your overall outcome.
If your bread seems to crack or “blow out” aside from your scoring this is a sign that your dough is under proofed. If that is the case with your home being cooler then just let it set out a little extra like mentioned above before putting it in the fridge. Below is an example of this.

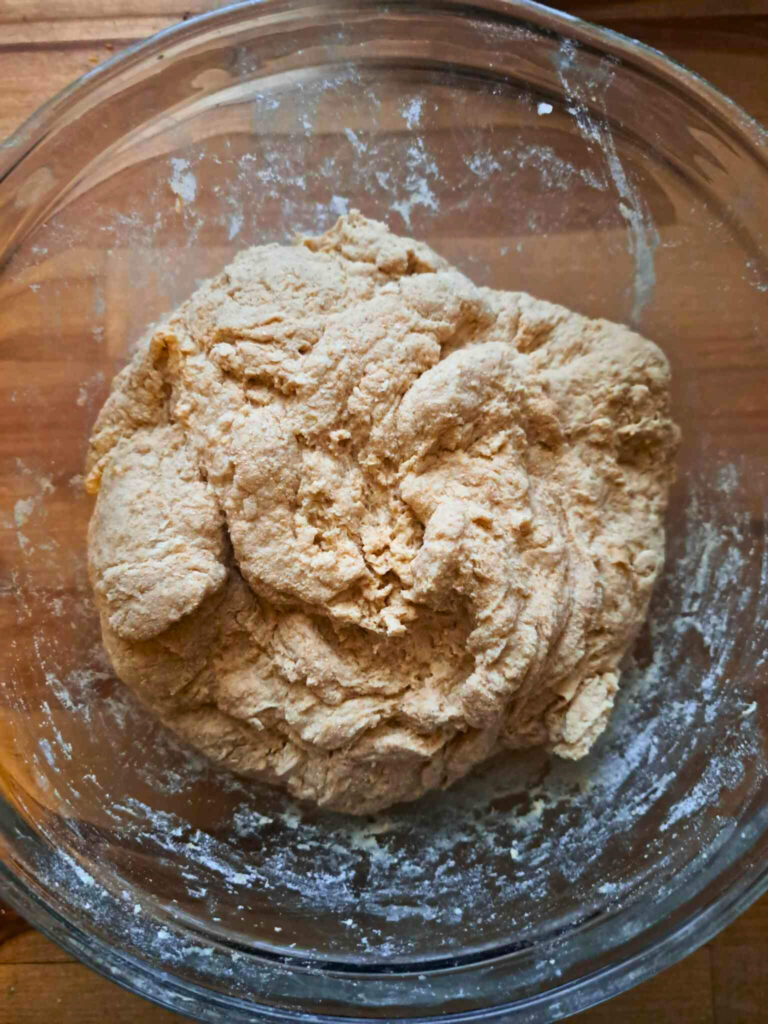
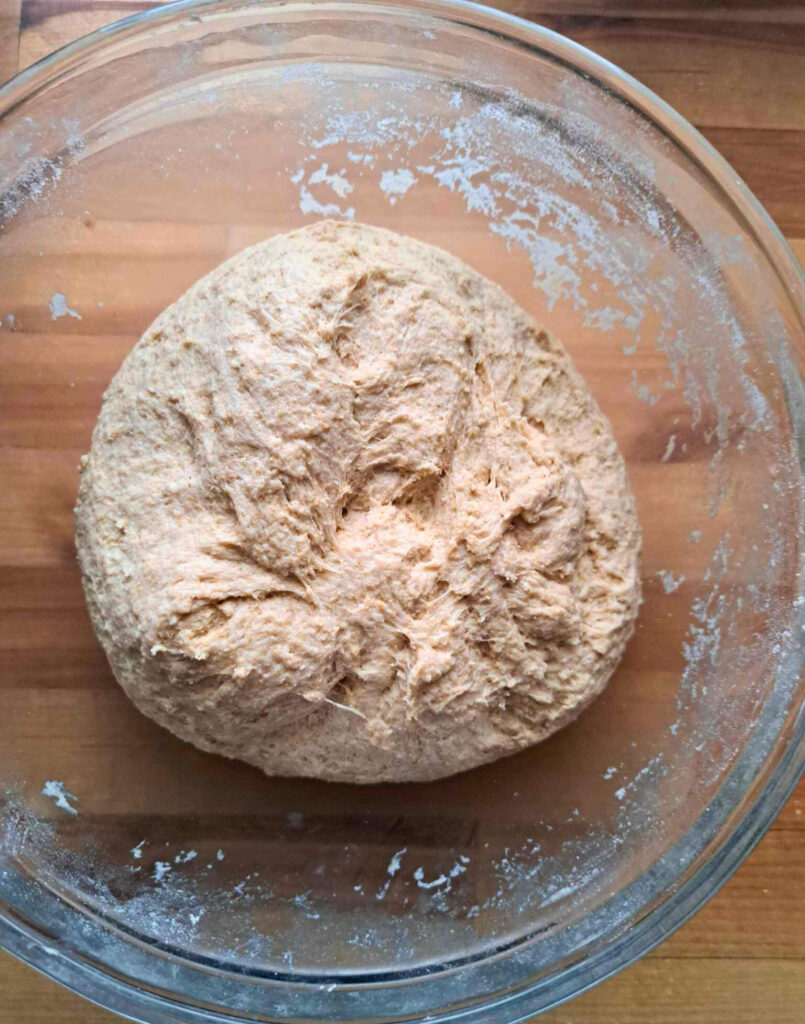
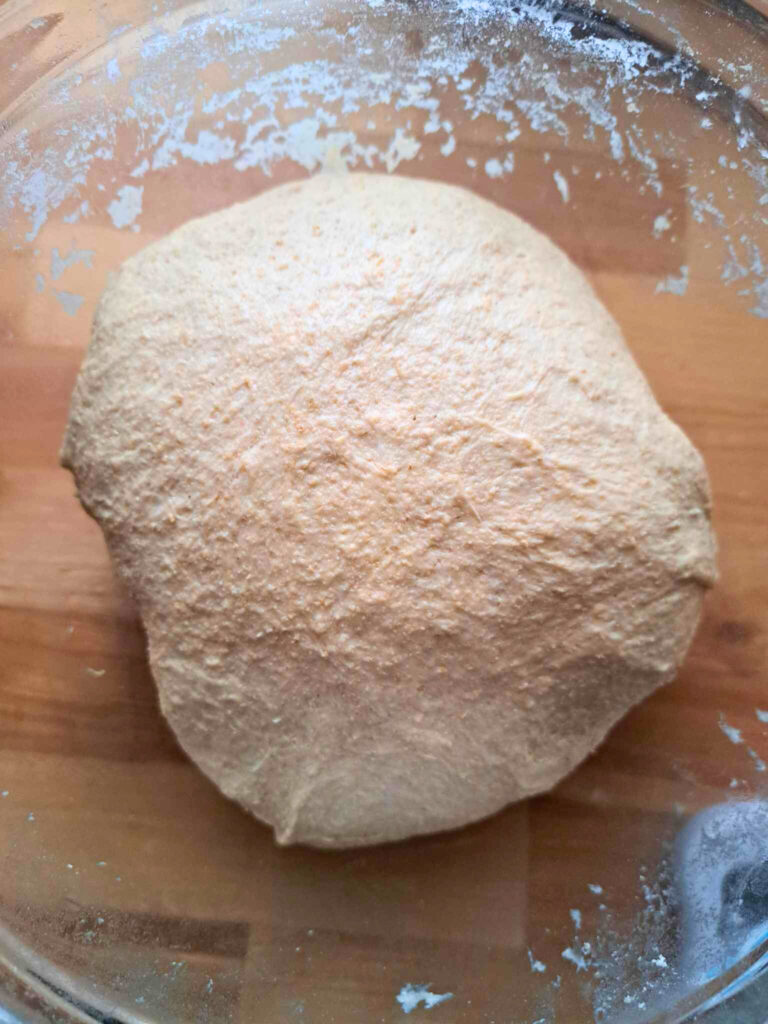
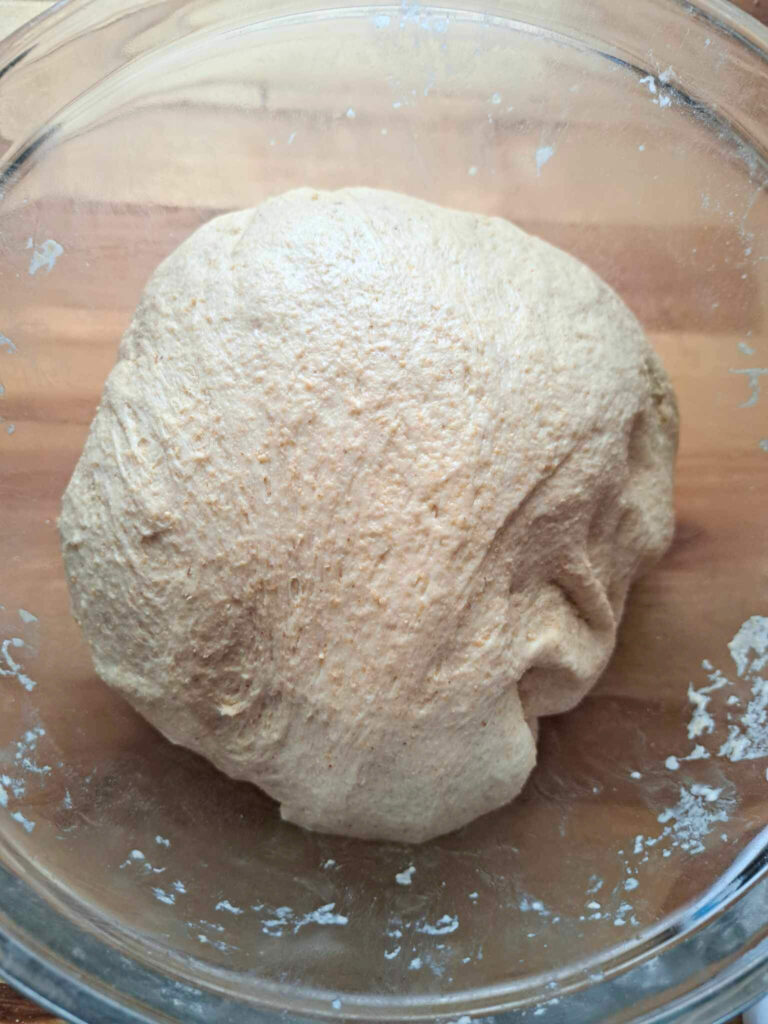
My Dough Seems Dry!
Don’t fret! This is part of the process. It will become more wet as the flour absorbs the liquid. Just remember the stretch and folds will not be as stretch and seem tighter than with sourdough made with store-bought flour. Below I will show you pictures of how the dough changes throughout the process.


What Is Hydration % In Sourdough And How To Calculate It?
Hydration refers to the ratio of water to flour in a sourdough recipe. This INCLUDES the amount of water and flour in your starter. If your starter is 100% hydration, meaning you feed it equal parts of flour and water then the percentage is then calculated by using the following equation:
(Weight of Water / Weight of Flour) x 100
For example: 489g water/651g flour = .75 x 100 = 75%
My sourdough recipe uses 438g water, 600g flour, and 102g starter. Since my starter is considered 100% hydration I divide the 102g/2 and this gives me 51g. The 51g water and 51g flour needs to be added to the original flour and water amounts my recipe calls for to calculate the dough hydration. So my total water = 489g (438g from recipe + 51g from starter) and my total flour = 651g (600g from recipe +51 grams starter).
It can get a little confusing when talking about the overall hydration in your dough or just the amount of water (aside from the water in your starter) in the recipe. So you have overall hydration and baker’s percentages.
How Do Baker’s Percentages Work?
Baker’s percentages list each ingredient as a percentage of the total flour weight, with the flour always being 100%.
Baker’s Percentage Formula: (Weight of ingredient / Weight of flour) x 100 = Baker’s Percentage
So this recipe’s baker’s percentages would look like the following:
Fresh Milled Hard White Wheat Flour 100%
438g Water 73%
102g Sourdough Starter 17%
Salt 2.6%
If using the optional gluten flour I upped the water to offset the additional flour to keep the total dough hydration near the 75% (with this combo the total hydration is actually 76%):
Fresh Milled Hard White Wheat Flour 100%
462g Water 77%
102g Sourdough Starter 17%
24g Gluten Flour 4%
Salt 2.6%
Knowing baker’s percentages in recipes is a great way to scale recipes up or down and getting the same results.
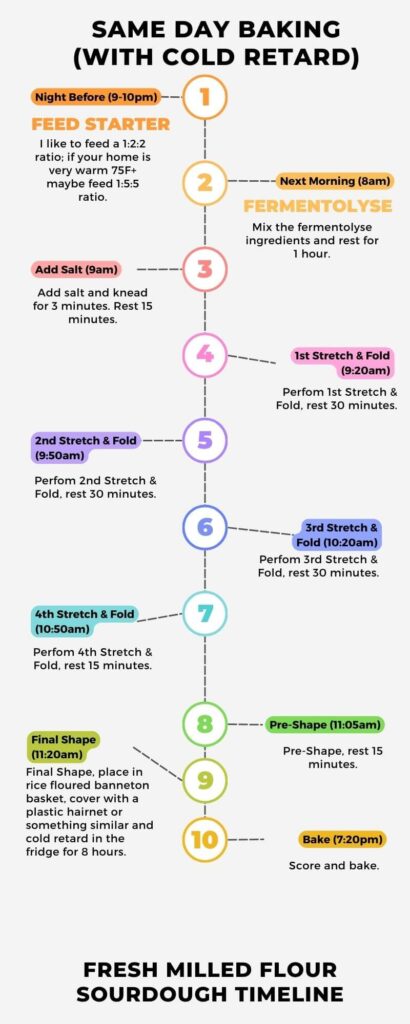
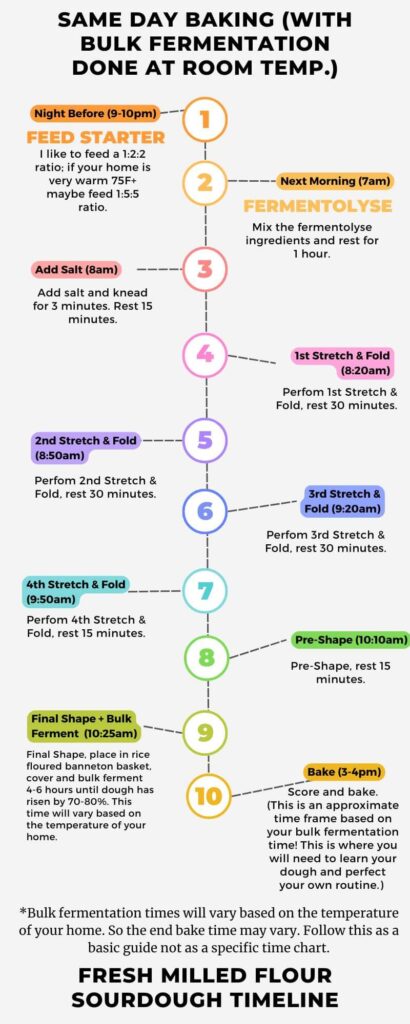
Sourdough Timeline Ideas
These are just some examples of different timelines I’ve used. Feel free to use them as a rough timeline and change the start time to get your baking done in a time frame that works with your schedule.

Common Sourdough Questions
Boule vs. Batard
A boule is just a term referring to a round loaf and batard is an oblong, oval shaped loaf of bread. I actually prefer baking the sourdough in the batard shape in the cast iron loaf pan that I have linked in the ‘Shop This Post’ section below due to the normal sandwich loaf shape it gives and I think the support from the sides give it a boost in oven spring.
Do I Really Need A Banneton?
Yes and no. It depends on your end goal. Just have edible sourdough bread, no. Achieving beautiful designs and a consistent shape, yes. So, for a while I was just using tea towels to line a pyrex bowl for my sourdough bread. This technically works, but the bannetons make your scoring better in my opinion. When using a banneton it helps your dough keep it’s shape and helps “wick” away just enough moisture to leave a “skin” for easier scoring. All in all I recommend getting a banneton if you’re going to be doing sourdough long-term. If you’re new or just experimenting don’t feel pressured to get one just to try making sourdough.
Do I Have To Have A Dutch Oven?
Technically, no. I have tried open baking and using a dutch oven and I definitely prefer using the dutch oven. The dutch oven traps the moisture and creates steam yielding a softer crust. When open baking you will have to add moisture by spritzing water directly in the oven or adding a pan of boiling water to the rack below your bread. I personally liked the crust better when my bread is baked in a dutch oven. The open baked crust was noticeably harder for me. I really like using the 2-in-1 dutch oven I have linked below in the ‘Shop This Post’ section. I use it upside down since the lid is the perfect shape for turning this dutch oven into a “dome” and you get the added perk of being able to see your loaf bake the rest of the time with the lid off without opening the oven!

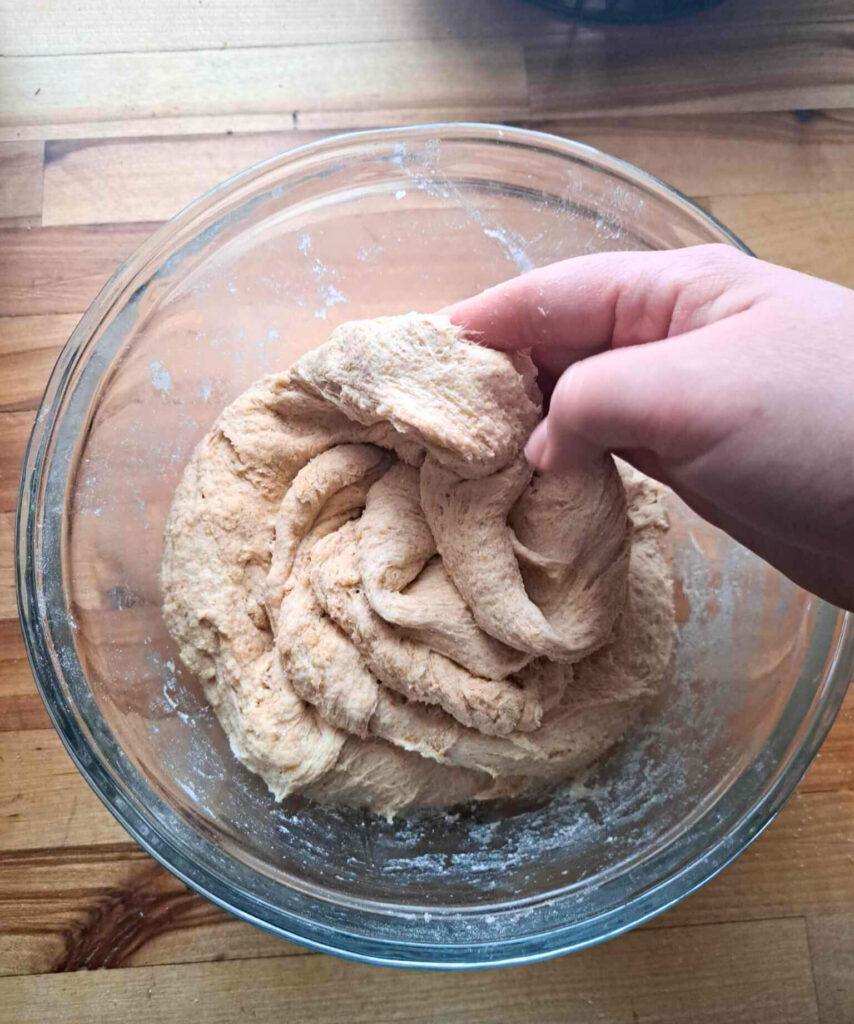
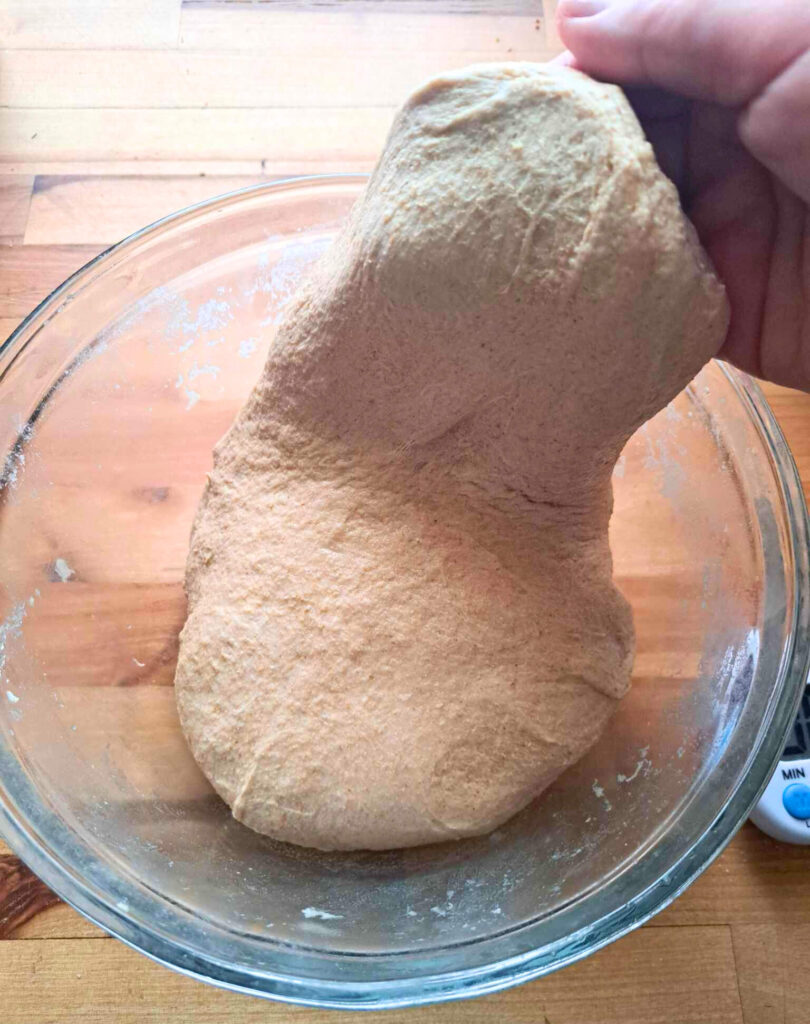
What Is A Stretch & Fold?
Stretch and fold is a technique where you gently pull a portion of the dough from the side of a bowl, stretch it out, and then fold it back over itself, repeating this process around the bowl to strengthen the gluten network within the dough, improving its texture and rise during fermentation. Turn the bowl about a quarter turn and complete 4 turns total to complete 1 round of stretch and folds.
What Is A Coil Fold?
A coil fold is a gentle folding technique used during bulk fermentation to develop gluten in the dough by gently lifting and folding the dough over itself, creating a coiling motion, which helps strengthen the gluten network without aggressively stretching it.
Autolyse Vs. Fermentolyse
Autolyse, pronounced “aw-toe-lease” refers to the process of mixing only flour and water together and letting it rest for a period of time before adding the sourdough starter and salt. My recipe uses the fermentolyse method which combines the flour, water, and starter together at the beginning allowing fermentation to start immediately before adding salt giving the bulk fermentation a head start.
Do I Have To Score My Sourdough Bread?
Yes, you should. Scoring allows the trapped gas to escape in a controlled manner during baking. If you don’t score your bread you will burst open at it’s weakest point causing cracking and uneven expansion. The main score should be between 1/4-1/2″ deep and if you are doing decorative scoring it will be closer to 1/4″. Keep in mind you will get better with practice and it is also easier to score dough that is cold from the refrigerator.
How To Store Sourdough Bread
For now I have been storing mine in a gallon ziploc bag. I know it’s not totally recommended if you want to keep your crust nice and crackly instead of soft, but I’ve tried a bread bag and it dries out pretty quickly and gets hard fast. So, at this point I’m going to say in the ziploc bag on the counter for 3-5 days.
To freeze: wrap the bread in plastic wrap or foil and put it in the freezer for up to 3 months.
Shop This Post


Where To Buy Grains Online


This post contains affiliate links, which means I make a small commission at no extra cost to you.
If you try this recipe and love it, I would love if you gave it 5 stars and leave a review below!
You can also Tag me on Instagram or Facebook @freshmilledmama and share a photo in my Facebook Group.

Sourdough Bread Made With 100% Fresh Milled Flour (Boule/Batard)
Ingredients
Equipment
Method
- First mix the active sourdough starter with the water until it's dissolved in the water. Add the water mixture to the flour (and gluten flour if using) and using a danish dough whisk, dough scraper, or your hands combine it until there is no dry flour left.
- Cover and let that fermentolyse for 1 hour.
- After 1 hour add in the salt and hand knead for 3 minutes. Then rest for 15 minutes.
- Perform the 1st stretch and fold, cover, and let rest 30 minutes.
- Perform the 2nd stretch and fold, cover, and let rest 30 minutes.
- Perform the 3rd stretch and fold, cover, and let rest 30 minutes.
- Perform the 4th stretch and fold, cover, and let rest 15 minutes.
- Pre-Shape and rest 15 minutes.
- Final Shape, place in a floured Banneton, cover Banneton with a plastic wrap, shower cap or something similar and put in the fridge for a cold proof up to 24 hours. *See note 1
- When ready to bake preheat your oven with the dutch oven to 500℉. (Leave your dough in the fridge until the very last minute – placing a cold dough into a hot oven will give you a better "spring".)
- When oven is preheated take your dough out of the fridge and gently invert it onto parchment paper. *See not 2
- Score your dough with a lame, clean razor, or sharp knife. The main score should be between 1/4-1/2" deep and if you are doing decorative scoring it will be closer to 1/4". Keep in mind you will get better with practice.
- Using the parchment as a "handle" lift your scored dough and carefully place it in your preheated dutch oven. Using a spray bottle do a few spritzes of water before putting the lid on.Turn the oven temperature down to 450℉ and bake for 30 minutes. *Place a baking sheet on the lower rack to "shield" the dutch oven so your crust doesn't over-bake or burn.
- Remove the dutch oven lid, turn oven down to 400℉ and bake for another 25 minutes. For even browning turn the bread half way through the last 25 minutes. If checking the internal temperature it should be around 205-210°F.
- Remove from oven and place bread on a cooling rack. Cool COMPLETELY before slicing. *If you cut into it while it's warm it will be gummy.
- Follow steps 1-8 and Final Shape, place in a floured Banneton, cover Banneton with a plastic wrap, shower cap or something similar and let bulk ferment on the counter at room temperature 4-6 hours until dough has risen by 70-80%. This time will vary based on the temperature of your home.
- You can check your dough with a poke test. *See note 3
- Bake as directed above in steps 10-15. Disregard any mention of the refrigerator in those steps.
This was so easy. I’m an experienced sourdough maker, even whole grain maker but I just started fresh milled. This was so easy that I was sure it wouldn’t come out. My home is cooler than you 70-75 degrees so I allowed for extra bulk ferment like you said. I used poke test. No added gluten
I wish I could add a photo. Yummy
Thanks.
So happy to hear your results! <3 I'd love to see a picture in my Facebook group! It's called Fresh Milled Flour Recipes if you aren't in it already.
I’m so glad I found this recipe. It turned out way better than any other recipe I’ve made in 3 years. I think the added gluten is what made it. Thank you
So glad it works for you!
I have soft white and red spring wheat berries. Can I use soft white instead of hard white? What would you adjust?
No, it needs to be a hard wheat. Soft wheat is for things like cookies, brownies, cake, etc.
Could I use half spelt along with half hard red?
I haven’t personally tried, but I believe it would work.
Hi, can I still add a bulk fermentation option in the recipe if desired?
That should be fine. Just be mindful that fresh milled flour sourdough bulk ferments faster.
I just found you on YouTube and I have been making almost the identical sourdough recipe as yours. I even mix my hard red and hard white flours just usually use less hard red.
I bake mine in the 9” Pullman pan.
My question to you is regarding using the cast iron bread pan. First, how do you like it? Would you recommend it over the Pullman pan for sourdough?
I like it a lot! It makes a nice size for sandwiches overall. I also like baking with the lid on with the steam and then removing it to finish. It gives a nice loaf.
I had recently taken “fro-dough” (my starter) out from the back of the fridge and converted it over to a fresh milled flour sourdough starter. This my first attempt at making a sourdough bread with fresh milled flour. It turned out wonderfully! I can’t thank you enough!!! I do have a question, have you tried using the Kamut grains?
Wonderful! I have played around with Kamut in small amounts in my sandwich loaves, but not sourdough at this time.
Hi, do you keep the lid on your pullman while baking? If so, any issues with overflow? With store bought flour, I use a max of 960 grams of dough in each pan. I am concerned about placing the lid on using this recipe, as it yields 20% more dough. 😅
I’ve been baking sourdough for about a year, just now diving into the fresh milled flour world. This recipe was super easy and made the most delicious bread!
So glad to hear! Thanks!
This recipe made me realize I’ve been overproofing my doughs with FMF in them. It was my first loaf that actually puffed up nicely in the oven. I used 400 hard white and 200 Kamut and it turned out nicely. Thank you for the recipe!
Glad it was helpful!
I have made this 4 times now. I’ve had good success everytime and we love the loaf. I do use a little more water than the recipe says, but we like the loaf to end up a little chewier. Thank you for posting your recipies!
I’m so glad to hear that you enjoy it! <3 You're welcome!
Love this recipe! Can it be doubled, tripled etc?
Thanks! Yes, it can!
Thank you for your site!! I’ve been baking with sourdough for a couple of years and am just now switching over to fresh milled flour. I’ve enjoyed reading through your process and recipes and I can’t wait to try this one out! Thanks!! I’ll be looking out for if you ever do fresh milled einkorn sourdough!
Glad you find it helpful!
I don’t usually comment, but this time I want you to know that I appreciate you!!!. I have been struggling to work with freshly milled winter hard white wheat. My sourdough loaves were not rising and just hard and dense. Then I found your recipe. I added the 25 GM of bread flour ( I did not have gluten flour), and I made sure my starter was bubbly and happy. I used the 1:2:2 ratio. My bread has a SOFT interior even though it looks dense (yeah) and firm crust. It’s perfect. Thank you.
Yay! I’m so glad to hear this! You’re very welcome!
I’m excited to try your recipe! I’m brand new to milling and this may be a dumb question.. is your starter also fed 100% with milled flour?
It is!
Is this recipe using a FMF starter? I have been keeping my starter as all purpose, will that still work or should I change anything?
This is using FMF, but either should work.
I just started using fresh milled flour after previously using store bought to make sourdough. I followed this recipe to make a loaf of bread. My dough is very stiff and not very stretchy during the stretch and folds. After the bake, the loaf seems pretty dense, like there’s not many air bubbles like when using store bought flour. I was wondering if you have any tips or advice to help me. Thank you!
It is still different than store-bought flour sourdough. You won’t get as many air bubbles inside and it is not nearly as stretchy. You’ll get a feel for fresh milled sourdough as you work with it.
I’ve just mixed and I know you said it might seem dry but when I use fresh milled flour my dough is always very wet and doesn’t come together well even after stretch and folds
Are you weighing ingredients or measuring by volume?
Thank you so much for the recipe! I followed the instructions for the next day bake with cold retard. I think it was over proofed since it became flat when i went to score it. My house is about 85 degrees in the summer. Is it possible it fermented quickly while doing the folds? Should I do the folds quicker and less time in the fridge after final shape.
My starter had also already reached its peak by the time I woke up to mix everything. Everything looked great when folding and stretching.
Thank you again!
This recipe turned out great for me. I used hard white. I did the extra ferment from the notes/comments because my house is cooler. I did not put in the fridge, but instead, baked that evening. I loved that the loaf was sour. I’ve been making fresh milled flour yeasted sandwich bread for months (since Feb) and oh how I’ve missed the sour flavor! Everyone devoured it. Thank you.
That’s wonderful to hear!
My friend gave me starter last week–I’d never baked sourdough before, but I’ve been using fresh milled flour for a while now. Your timeline was SO helpful (I did the same day cold retard) and it turned out *perfectly*! I am a little shocked, actually–always heard sourdough was tricky haha. Thank you! Only suggestion would be a little more info or a link about feeding the starter, and about the pre-shape and shape
Thank you!
Just made this recipe and it’s fantastic! I added in some roasted garlic chopped, fresh oregano/rosemary and a sprinkle of havarti cheese at the second stretch and fold. Perfecto! Thanks for the great recipe!
That sounds AMAZING! So glad you enjoy it!
Have you added honey and oil with success for sourdough with fresh milled flour? How much would you add?
I haven’t tried that yet.
What is the least amount of time the loaf needs to stay in the fridge?
That is up to you and how long you want it for fermentation and flavor.
do I need to be concerned about it over proofing in the refrigerator during the night?
No, it will be fine in the fridge.
Can you just double all the ingredients to get 2 loaves or does that mess up the science part of this project 🤔🤣
Yes!
I followed the recipe exactly and my loaf came out super gummy and underdone. I waited until it completely cooled to cut. Is this a bulk fermentation issue or something else?
This could be a proofing issue.
New to making sourdough with FMF! Can I long ferment the dough? Gluten sensitive family here and long fermentation (48-72hrs) in the fridge is what I did before I using normal store bought flour.
That should be fine!
If using a cast iron loaf pan – do you preheat it in the oven? Or do you put your shaped dough in the cast iron pan in the fridge – let it come to room temperature the next day – then bake?
I do preheat the cast iron pan and than score, transfer, and bake straight from the fridge.
A success! Turned out sooo yummy. Love the flavor of fresh milled vs store bought flour sourdough. Great recipe and easy to follow. I was thinking of long fermenting this recipe. Any recommendations on how to do that?
Glad to hear! This should be fine to long ferment and bake as usual.
This was my first foray into making sourdough bread with fresh milled flour. I used 100% hard red wheat berries and the oven spring was great. The crumb was excellent and the nutty/earthy flavor of the bread is incredible. By far the best sourdough loaf I’ve ever made in terms of taste. This recipe is a keeper! I just wish I could share a picture of how well this loaf turned out!
So glad to hear!
Thank you so much for all this information!
I followed your directions using all hard white wheat and no wheat gluten. This is the best loaf I’ve made since switching to FMF. I was definitely over proofing during the bulk fermentation with my other attempts.
That’s wonderful!
Great recipe! I’ve made this a couple times now with 50/50 hard red and hard white and added the VWG. Amazing! I’ve tried the 8 hour cold proof and an 18 hour cold proof and both had great flavor! Thank you so much for making this so easy!
I love how clearly you explain everything! This recipe made the process less stressful and actually enjoyable! My bread came out great ! Thank you so much !!
This makes me so happy to hear! You’re welcome!
My first loaf from this recipe is in the refrigerator until tomorrow, so I can’t comment on that yet, BUT…do you have any videos or pictures of the preshape and shape process? Thanks!! 🙂
I don’t. I just gleaned off of videos already out there.
Hi. Thank you for the detailed description. I have a question about the 1:2:2 ratio you use for the starter. Is this on 1 part starter: 2 parts flour: 2 parts water? If, then this hydration is not 100%. Is this accounted for in your recipes. Thanks again. Daniel
Everything I read states that since water (2 parts) and flour (2 parts) are equal, it remains a standard 100% hydration.
I have only been milling and making sourdough for ~3 months. This recipe is the only one I can make with consistent results. I make it in a stoneware loaf pan with another loaf pan inverted on top. I usually have to bake 5 min. longer to get to 205. I use the 50/50 hard red / white with the vital wheat gluten.
Glad you found what works for you!
Hi! To scale up this recipe, can I simply multiply the ingredients by how many loaves I need to make? Or it’s not that simple?
Yes, that’s what I do!
I’ve been making my own fresh milled flour bread for a couple years now and love it! What I haven’t been successful at is getting a sourdough starter to work. Trust me when I say I’ve tried multiple recipes and techniques without a viable starter for my efforts. Both disappointing and frustrating! My question for you is: can you substitute instant yeast for the sourdough? Would I follow the same directions and timeline?
I haven’t tried using yeast in this recipe.
Hello! I am new to bread making. I have purchased a mill! But I have not learned about sourdough yeast yet. Will this recipe work using dry active yeast and fresh milled flour?
And following all of the other instructions?
Thanks, Jill
Hello! I haven’t tried this recipe with yeast.
This recipe is fantastic and takes all the guessing out of sourdough!! Thank you so much. I followed this exactly- first time I used all hard white with gluten flour, second time I used white, a little red, a little kamut, and gluten flour. I doubled it and baked one the same day and the other after 48 hours in the fridge. Both so pretty and yummy.
Glad to hear! Thank you!
this recipe is easy to follow and appears to be turning out well. I am in the middle of the last rise before baking. in the notes, it says how to perform the poke test… Mine apprears ready to bake but it has only been raising for 1-1/2 hours, my house is 74 degrees. Is that likely? I don’t want to bake it too soon!
It could be if it’s warmer, but it’s hard to judge from afar!
I have learned a great deal just by reading your article. Thank you for sharing your experiences and what you learned from them! I’m new to fresh milling but love the benefits I’m reading about. As soon as I follow your step-by-step guide, I will share my results. Thanks again for sharing your knowledge and recipe. New subscriber to your page and looking you up on social media. Gratefully, Alleyne
Awesome! Thanks for the feedback.
I have had several sourdough bread failures and a couple of edible (make croutons!). But, I have made 2 loaves of this bread and both have been a HIT! Nice rise, great flavor and totally delicious. Thank you for such a great and simple recipe.
I did use the VWG in both loaves. Only 1/4 hard red, the rest hard white.
Yay! So glad to hear this!
Can you pls share what ratios you use to feed your starter the night before for this recipe? Thanks!
I usually do 50g starter, 50g water, and 50g of flour so I have enough for the bread recipe and some left over to feed and keep my starter going.
Thanks for an awesome recipe! Mine came out so delicious. Now my go to. Wish I could send you a picture!
So glad to hear! If you are part of our group ‘Fresh Milled Flour Recipes’ on Facebook feel free to share it there!
I followed the recipe for the FMF sourdough. The frig time was 19 hours and I did not get much of a rise in the refrigerator (I think that is normal) but I also did not get a rise in the oven. I did find my scores were not deep enough… could that be the reason?
I don’t get much of a rise in the fridge. What is your average house temp? If it’s cooler than 70F I would recommend even letting your dough proof a little longer in the banneton before putting it in the fridge. I don’t think the scoring has anything to do with the rise.
Thank you so much, I am going to try again tomorrow!
How would I make this recipe using only freshly milled hard red wheat flour? Do you recommend adding gluten?
You can use all hard red. You may need to up the water just a little. If using all red, I would recommend the gluten flour.
This bread is going to make me fat. I cannot stay out of it. Thank you though! Wonderful recipe!
Hi! I just made this loaf in a round shape (and the 100%Hard white wheat +gluten flour). It looks delicious, but did not give much of a rise at all in the oven. I proofed it overnight in the fridge. The house is about 68 degrees – should I have proofed it on the counter more before putting it in the fridge? I also live at about 5000 ft altitude – not sure if that has an effect, but I often struggle with getting a good rise in my breads. Maybe I should switch to a loaf pan?
The altitude may be affecting it, but I’m not sure how since I’ve never had to adjust for that. Start by letting it proof another 1-2 hours before sticking it in the fridge. The loaf pan does help give it a boost as well.
I have tried making sourdough bread with my freshly milled flour and it hasn’t turned out well UNTIL I tried your recipe and followed it to a T!! YOU are amazing and our family of 5 thanks you IMMENSELY!! I’m now going to make another one of your recipes. Thank you for helping us in this world of using FRESHLY milled healthy flour! You’re the best! If you have a cookbook I’d buy it!!! From a very grateful mama’s heart- Jill
<3 <3 Thank you so much! Glad it's working out well for you!
When making the bread in the loaf pan, do you do the long fermentation in the fridge right in that pan? or in a banneton?
I ferment in an oblong banneton.
This is my go-to recipe for sourdough artisan bread. I have been making two at a time: one 100% hard white wheat and one 50% hard white wheat/50% hard red wheat (Rouge de Bordeaux). Delicious!
That’s wonderful! Glad to hear!
Oh my goodness! I’ve been baking sourdough bread for over 50 years. About 5 years ago, I switched to using only FMF in my home. Although my 100% whole wheat FMF sourdough was tasty, it had nowhere near the spring commercial flour gives. I started this recipe yesterday using your 50/50 hard red and hard white ratio. I used vital wheat gluten too. After the overnight proof in the frig, I baked as your recipe stated. Firstly, the aroma is VERY different. Amazing. I nearly dropped my cast iron combo cooker top when I removed it after the first portion of the bake. The oven spring was so high that it almost touched the top of the lid. My boule is cooling right now and it’s killing me to wait to cut into it. Your recipe is completely different from anything else I’ve seen. I appreciate all the work and the amazing results. During the bulk fermentation, I watched a YouTube video suggesting the use of 1/8 tsp. ascorbic acid to the water before mixing. In side by side testing this trick resulted in a substantially better rise and crumb using 100% FMF. I’m going to test that using your recipe next time I bake. Again, Thankyou!
Wonderful!!
I use the loaf pans too (cast iron) but I open bake because I am a minimalist. To solve the hard crust problem, slather the tops in butter as soon as they come out of the pans. Delicious! Also, instead of using expensive ziplock bags, you can usually buy a roll of the produce bags at your local grocery store. I have bought them from multiple stores. We originally bought them for dirty diapers and litter box debris. But our cat passed and our kids are older. The bags have so many uses and a roll of hundreds is only $20. I live in N Idaho. I believe you can get a similar product on Amazon.
My first FMF loaf and this recipe worked great for me! I did knead the dough in a kitchen aid for about 10 extra mins and added a couple tablespoons of honey with the salt to make it soft. Thank you!
Wooohooo! That’s great!
I had the same question as Daniel( comment above) concerning hydration. Could you reply to the question about the 1:2:2 ratio you use for the starter. Is this on 1 part starter: 2 parts flour: 2 parts water? If, then this hydration is not 100%. Is this accounted for in your recipes. Thank you
Everything I read states that since water (2 parts) and flour (2 parts) are equal, it remains a standard 100% hydration.
Will soft white wheat make a difference compared to hard in the recipe? There’s a local mill in my area and they have soft white, not hard!
It has to be a hard wheat to have enough protein for gluten development.
I have 6 fresh milled flour cook books, tons of TikTok videos saved, and many articles that I’ve read on how to do sourdough. The ONLY thing you need is this one! I followed exactly as written and happy to say my first loaf came out PERFECT! Thank you freshmilledmama for making it so easy to follow and giving me the confidence to jump in and just do it!!
Woohoo! Thanks for sharing!
Can’t wait to see how this recipe turns out.
If bulk fermenting in the fridge, do you still perform the poke test to see if it’s ready? Also how long did you leave it in the fridge? I have my dough in there now. It’s more than 24hr and if I person the poke test it spring back pretty quick still. Could you give me some advice/help.
Thank you!
I honestly don’t use the poke test on this recipe. If you feel it needs more time to proof just leave it on the counter in the banneton for a little bit before scoring and baking.
This recipe is so good! I an really sold on the health benefits of freshly milled flour, and your recipe is the best I’ve found. Thank you for sharing!
Thank you so much!
I’ve tried both methods now (same day and cold proofing) and they both turned out excellent. I was about to give up on FMF sourdough! Thank you!
Wonderful!
I haven’t made this yet, but am wondering…if it doesn’t do the long bulk ferment out is it still fermented enough for the benefits of fermentation? I do sourdough for easier digestion. Every loaf I’ve made has been dense and pretty much flat. I plan to try this one today, but want to understand if it is still fermented enough for the benefits of fermented bread. Thanks.
I think it will still have a benefit, I just haven’t researched a lot into the different length of time benefits.
Great recipe! Thanks for sharing! Making a second loaf already since my kids gobbled it up!
This is my go to recipe for fresh milled sourdough. The overnight ferment really allows the flavor to develop. So easy, such a delicious bread.
Hi! I look forward to trying this recipe with my wheat berries that are on the way! For your starter, do you use AP flour or your FMF? In my research, I have read that it is very hard to maintain FMF starters, so I planned to continue using Azure AP flour for my starter, which is thriving thankfully!
I use FMF, but either should work.
Do you she started made with fresh milled flour? Right now I have just been using all purpose for my starter
I have been making traditional bread for years, only recently making the foray into FMF baking. I was *struggling* to figure out the right formula for moisture content, gluten development, rise etc. Yours is the first FMF sourdough proportions that I have found consistent success, so I call that a win! Thank you so much.
Can you use this recipe and add inclusions?
Yes!
Excellent recipe! I doubled it and made one into a boule And one into a loaf in a bread pan. I covered it with another loaf pan on top and baked it as instructed. I didn’t preheat the pan because I proofed it in the loaf pan. Just scored and baked, and it turned out the most beautiful loaf I’ve made! Thank you! This is now my go-to recipe
<3 <3 <3
Thanks for this! Very informative. Can I set it in the fridge for 3 days for my gluten sensitive friend?
I think that should be fine!
This is the recipe you’re looking for! It was my first time achieving beautiful sourdough loaves! Thank you, thank you, thank you!
I’m getting ready to try this recipe and excited after reading all the comments!
Does this work well mixing with a stand mixer or is it better by hand? I to do multiple loans at a time. Thank you!
For multiple loaves it would probably be easier with a mixer.
How many loaves dos this recipe make?
1 loaf